



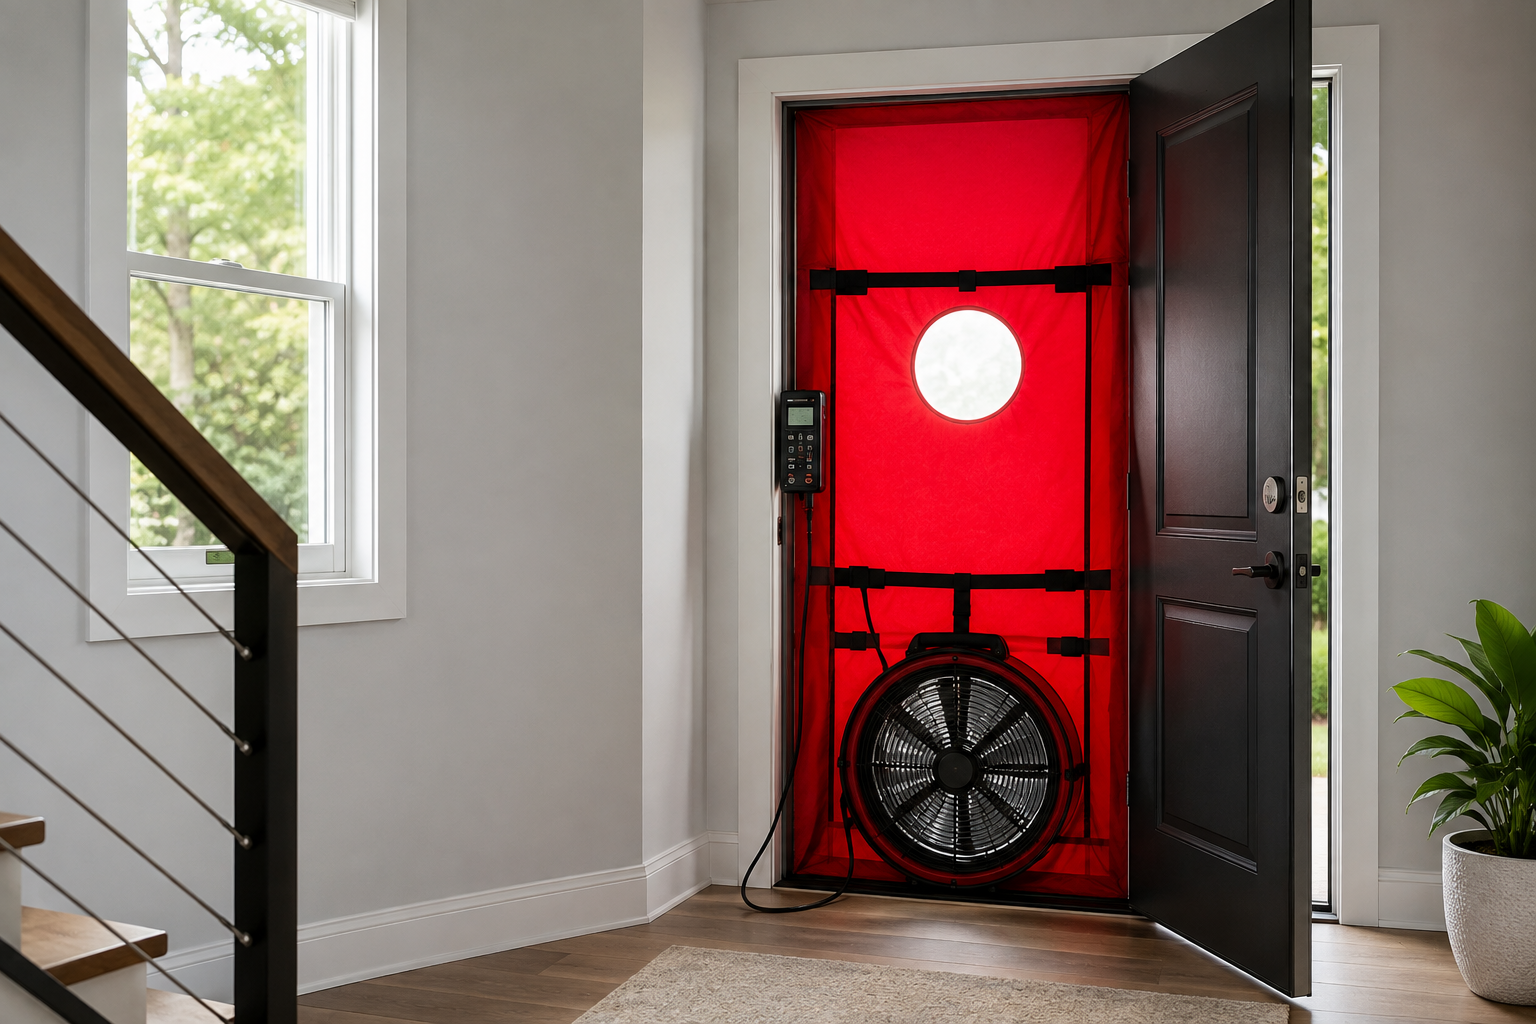
Energy testing on buildings is performed using a combination of pressurization tests, airflow measurements, and thermal diagnostics that quantify exact air and HVAC distribution losses.
The core testing process relies on three primary diagnostic tools:
- A blower door test to measure envelope air leakage at a standardized 50 pascals
- A duct leakage test to identify distribution losses
- Thermal imaging to visually pinpoint insulation voids and thermal bridging
According to the U.S. Department of Energy, air leakage and inadequate insulation account for up to 30% to 40% of a building’s total energy loss annually.
Energy testing helps builders and contractors reduce energy loss, while also qualifying them for beneficial rebates and tax credits.
In this article, you will learn the step-by-step testing procedures for blower door, duct leakage, and thermal imaging diagnostics, as well as how these measurements combine to generate a HERS rating and HVAC Quality Installation Verification.
You will also learn key operational differences between testing new construction versus existing buildings, and how diagnostic results enable compliance with Energy Star, Zero Energy Ready Home certification, and 45L tax credit eligibility.

Method #1: Blower Door Testing
A blower door test measures a building’s total air leakage by depressurizing the interior to a standard pressure of 50 pascals.
The results are measured in ACH50 (air changes per hour at 50 pascals), the standard metric used for building energy codes, HERS ratings, and green certifications.
Here is how the test is performed:
- Setup: he rater mounts a fan into an outside doorway, closes all exterior windows and doors, and opens all interior doors.
- Depressurization: The fan pulls air out of the building, creating a 50-pascal pressure difference. This draws outside air in through every unsealed gap, crack, and wall penetration.
- Airflow Measurement: The fan calculates the exact volume of air needed to maintain that pressure differential, establishing the building’s total leakage rate. (Note: For new builds, a positive pressure test may also be run for verification.)
- Leak Location: While the building is depressurized, the rater walks the interior with a thermal camera or smoke pencil to pinpoint the exact location of air leaks.
Air leakage is evaluated against specific performance targets, measured in ACH50 (air changes per hour at test pressure). A lower score indicates a tighter, more energy-efficient building envelope:
- Standard Building Code (2021 IECC): Requires 3.0 ACH50 or less across most of the U.S. (Climate Zones 3 through 8) to pass inspection.
- Energy Star (v3.2): Sets a maximum threshold of 3.0 ACH50 nationwide for program certification.
- Passive House: Demands an ultra-airtight target of 0.6 ACH50 or less; roughly five times stricter than standard code.
During the test, the rater uses a thermal camera or smoke pencil to find the exact leaks driving up the score. This illustrates to builders and homeowners precisely where to seal.
Method #2: Duct Leakage Testing
Duct leakage testing measures how much heated or cooled air escapes through gaps, unsealed joints, and loose connections in your HVAC system before reaching living areas.
Leaky ducts are a major source of energy waste, with typical residential systems losing 20% to 30% of conditioned air.
The two most important measurements of a duct leakage test include:
- Total Duct Leakage: Measures all air escaping the system into both conditioned and unconditioned areas (expressed in CFM25—cubic feet per minute at 25 pascals of pressure).
- Duct Leakage to Outside: Measures air escaping specifically into unconditioned spaces like attics, crawlspaces, or garages. Since this air is permanently lost, energy codes focus primarily on this score.
To test for duct leakage, a technician first seals all supply and return vents with temporary adhesive covers.
A specialized duct-testing fan is then connected to a central return grille to pressurize the system to 25 pascals and measure the total air escaping the ducts.
Finally, the technician pressurizes the house simultaneously to isolate and measure only the air escaping directly to the outdoors.
Under the 2021 IECC code, duct leakage is limited to 4 CFM25 per 100 square feet of conditioned floor area, unless the ducts are located entirely within the home’s thermal envelope.
Programs like Energy Star and Zero Energy Ready Home (ZERH) enforce even lower leakage thresholds and require formal HVAC Quality Installation Verification.
Method #3: Thermal Imaging
Thermal imaging uses an infrared camera to measure surface temperature differences across walls, ceilings, and floors. While the camera measures surface temperatures rather than direct energy loss, these thermal patterns reveal hidden building defects and air movement.
To produce clear results, thermal imaging requires a temperature difference of at least 15°F to 20°F between indoors and outdoors.
In mild weather, the building may need to be artificially heated or cooled to create this differential.
Thermal imaging can reveal the following issues with your building thermal envelope:
- Missing or Compressed Insulation: Uninsulated areas show up as cold spots on interior surfaces in winter (or warm spots in summer) because they track the outside temperature.
- Thermal Bridging: Wood framing transfers heat faster than insulation. Thermal imaging distinguishes expected structural framing lines from unexpected voids between studs.
- Air Leakage Pathways: Drafts leave distinct temperature streaks near penetrations, outlet boxes, plumbing chases, and rim joists.
- Moisture Intrusion: Wet insulation and materials hold heat differently than dry ones, making water leaks visible before damage appears.
Note: Thermal imaging is most effective when paired with a blower door test. Depressurizing the building draws in outside air, amplifying temperature streaks and making hidden leaks much easier to spot.
How Energy Testing Drives Your HERS Index Score
A HERS (Home Energy Rating System) Index score translates a building’s physical test results into a single number that measures overall energy efficiency.
The score compares a house to a standard reference home built to 2006 energy code, which carries a baseline score of 100.
Lower scores indicate a more efficient home, with each 1-point drop representing a 1% decrease in energy consumption; a score of 0 represents a net-zero home.
To generate the score, a certified rater feeds exact building specs, insulation levels, window ratings, lighting, and HVAC efficiency along with the physical blower door and duct leakage test numbers into RESNET-approved simulation software like REM/Rate.
The software runs an annual energy model that calculates the home’s final score.
Why the HERS Score Matters
The HERS score serves as the central benchmark for building quality, energy efficiency, and financial incentives. It is the core requirement for green building certifications, such as Energy Star (which usually requires a score between 52 and 60) and the DOE Zero Energy Ready Home program.
A qualifying HERS score also provides necessary documentation for federal tax incentives like the Section 45L credit for builders (available for homes purchased between January 1, 2023 and before July 1, 2026).
The Importance of HVAC Quality Installation Verification
HVAC Quality Installation Verification is required for Energy Star and Zero Energy Ready Home certifications under RESNET/ACCA Standard 310.
This verification ensures that an HVAC system delivers its advertised energy efficiency in the real world.
A system may look perfectly sized on paper, but issues like improper refrigerant levels, poor airflow, or weak duct connections will significantly degrade performance and increase operating costs.
To verify installation quality, a certified rater tests three core performance metrics:
- System Airflow: Measures the total volume of air moving through the system (in CFM) against design specifications. Insufficient airflow drops system efficiency and degrades humidity control.
- Refrigerant Charge: Verifies correct refrigerant levels using manufacturer-specified subcooling or superheat protocols. An incorrect charge can cut operating efficiency by 10% to 20% and cause premature equipment failure.
- External Static Pressure: Gauges resistance within the ductwork. Excessively high static pressure—usually triggered by undersized ducts or restrictive filters—forces the fan motor to work harder, accelerating wear and lowering comfort.
Combined with duct leakage results, these diagnostic measurements provide proof that the HVAC system performs as designed.
Energy Testing for New Construction vs. Existing Buildings
Energy testing serves different purposes at different stages of a building’s life, and the testing sequence differs accordingly.
New Construction: Stage-by-Stage Verification
For new construction, testing follows a phased sequence designed to verify compliance and fix issues before walls are closed up:
- Rough-in Blower Door & Duct Testing: Conducted before drywall is installed and while mechanicals are exposed. This test catches air leaks or loose duct connections at this stage, allowing builders to make repairs at the lowest possible cost.
- Final Blower Door & Duct Testing: Performed on the completed building to generate official as-built numbers for code compliance, green certifications (like Energy Star), and tax credit documentation.
- HVAC Verification: Completed once the system is fully installed and commissioned to verify airflow, static pressure, and refrigerant charge.
Existing Buildings: Diagnostic Audits
In existing homes and commercial structures, testing is usually triggered by high energy bills, hot/cold spots, or planned retrofits.
Rather than focusing on code compliance, an existing building audit combines performance testing with utility bill analysis to pinpoint energy waste.
The resulting report provides building owners with a clear, prioritized roadmap of energy improvements ranked by return on investment.
Whether verifying a new build for code compliance or diagnosing comfort issues in an existing structure, standardized energy testing provides the verifiable data needed to eliminate air loss, lower utility bills, and maximize overall building performance.
Frequently Asked Questions
What is a blower door test?
A blower door test measures how airtight a building envelope is by using a calibrated fan sealed into an exterior doorway to depressurize the home to 50 pascals. The fan calculates the exact airflow required to maintain that pressure differential, producing a score in ACH50 (air changes per hour at 50 pascals).
Standard energy codes like the 2021 IECC and Energy Star cap allowable air leakage at 3.0 ACH50 or lower, whereas strict standards like Passive House require 0.6 ACH50 or lower.
What is a HERS score?
A Home Energy Rating System (HERS) score is a standardized metric that measures a home’s overall energy performance relative to a standard 2006 reference building, which carries a baseline score of 100. Lower scores indicate greater energy efficiency, with every 1-point reduction representing a 1% decrease in energy consumption.
Certified raters calculate the final score by entering physical test data alongside home construction specs into approved modeling software to satisfy requirements for Energy Star, Zero Energy Ready Home certification, and 45L tax credits.
How long does energy testing take?
A complete new construction energy test for a single-family home, including blower door testing, duct leakage diagnostics, HVAC verification, and HERS documentation, typically takes between three and four hours. A standalone rough-in blower door test takes about one to two hours to complete.
For existing homes, a full energy audit generally requires two to four hours depending on the overall size and complexity of the property.
When should energy testing be performed during construction?
Energy testing should be performed at two key stages of construction: rough-in and completion. Conducting a rough-in test before drywall is installed allows raters to identify air-sealing defects and duct failures while framing and mechanicals remain accessible, significantly reducing correction costs.
The final test occurs once construction is fully complete to establish official as-built performance numbers for code compliance, green building certifications, and tax credit eligibility.
What is duct leakage to outside?
Duct leakage to outside represents the volume of conditioned heating or cooling air escaping directly into unconditioned areas such as attics, crawlspaces, or attached garages. This is the primary metric governed by building codes because air lost to unconditioned buffer spaces is entirely wasted, whereas air escaping into conditioned living space still contributes to heating or cooling the home.
For this reason, most energy codes and efficiency programs enforce specific leakage-to-outside limits rather than total system leakage.